Creating a tag page with Gatsby
September 12, 2019 . 12 min read
blog
gatsby
tags
And here I am, a couple of weeks of starting my blog, now with a couple of posts. Not yet what I want or like, but a very nice work in progress, I would say. Something that I will refine, improve and learn from. After all, that was the goal, to learn more stuff about coding!
Let's have a look to what I have written when I started:
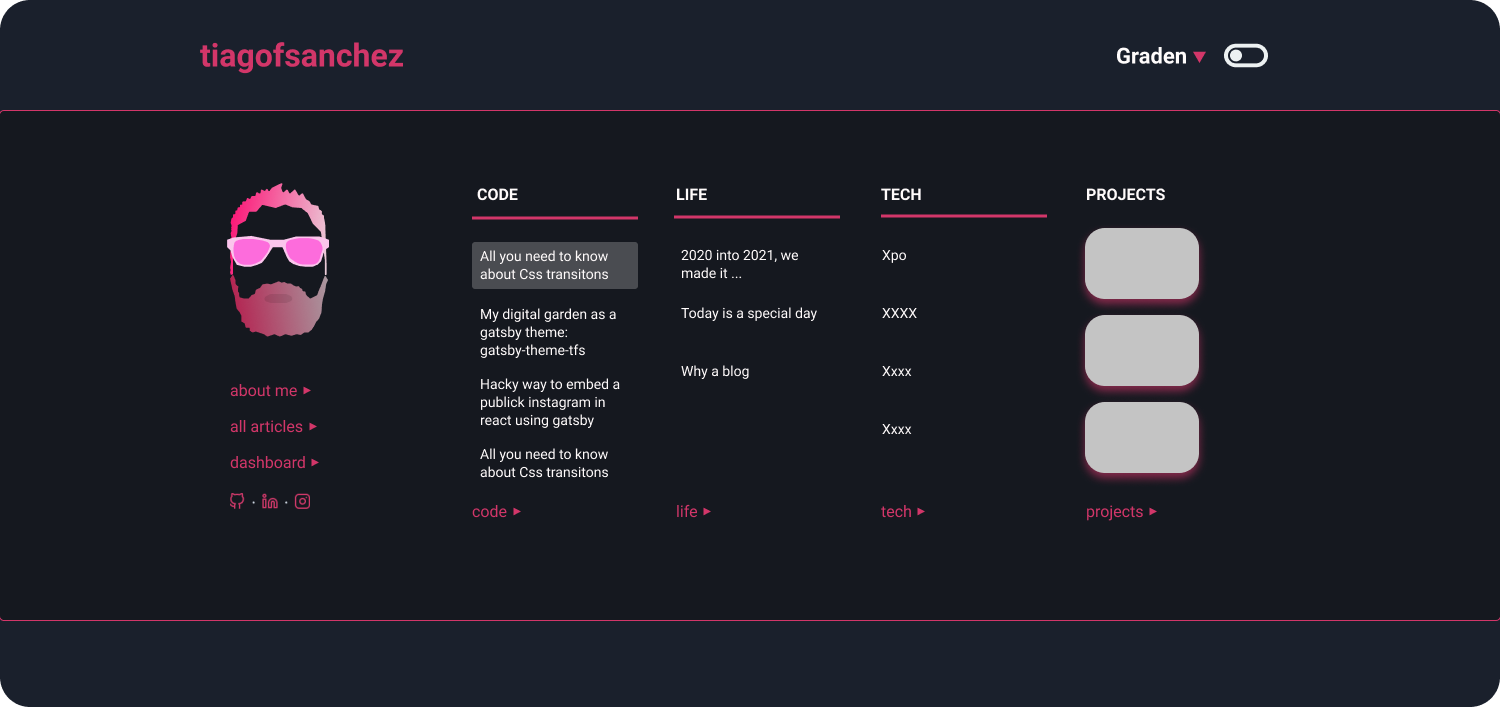
Using the Gatsby blog theme to create my new blog.In this blog I will write about new stuff that I been doing and learning, such as:- ✍️ learning to code (front-end-development in React);- 🏃 getting outside my comfort zone with running (for now);- 💡 innovation and fintech related topics;- ✈️ travelling with my family;At the moment I am just creating the template for the blog with a couple of tweaks to the Gatsby theme.Stuff that I need to do:1. Add timeToRead (tags and categories) to main page of the blog;2. Publish using Netifly;3. Header / Navigation to get (a)all posts and (b)posts by category;4. Subscription form;5. ...Well, at the moment I am trying to tackle activity number 3 - I wanted to create a navigation menu where the user would be able to select the different types of categories of posts, have them rendered in one page and select the post according to his need. For that I needed to learn a couple of things first, so I decided to work on a new gatsby site using gatsby-starter-hello-world to make things easier.
Check out the final repo
This was the end result:

Let's check out how this was done.
Working through the markdown files
I will assume that you are familiar with gatsby, so will go through this first step rather quickly. Here, there are two things that you have to bear in mind; (1) you need to enable gatsby to go through your files and read them so that you can have access to their data and (2) you need to enable gatsby to understand what he is looking for, and in this particular case that will be your Markdown files.
Let's start with (1)
Here you will have to use the gatsby-source-filesystem plugin, install it using npm install --save gatsby-source-filesystem and add it in your gatsby-config.js file (we will do this after going through (2)).
(2) Letting gatsby know what he should be looking for
For that you will need to use gatsby-transformer-remark plugin, and in the exact same way that you install your first plugin: npm install --save gatsby-transformer-remark and add it in your gatsby-config.js.
//gatsby-config.jsmodule.exports = { plugins: [ "gatsby-transformer-remark", { resolve: `gatsby-source-filesystem`, options: { name: "pages", path: `${__dirname}/src/pages` } } ]};Now, your gatsby is able to read through your Markdown files as well as "read" through them. This is absolutely crucial as you will need this to happen so that you can query for that information using graphQL. We will go through this in a little bit more detail latter in this post.
After doing all this, you will be able to go to your index.js file, that will be your home page, and render any blog posts (markdown files) that you have built in the src/pages folder.
If you want to go through this in more detail, I would suggest the following gatsby documentation.
Building the slugs automatically
If you tried to .map() your posts in your index.js you will see that you can't click on them without encountering the 404 development page, hence we will need to create the slugs for the posts and make sure that they will render in a template that will be created for that purpose.
The question here would be how and where should one create the slugs? To do that you will be creating a new file gatsby-node.js on the main folder. Here I will drop the code that I have built to create the slugs and pages automatically and will explain what was done after the code.
// need this to get access to pathconst path = require("path");// This will create a new page and "inject" props to a componentexports.createPages = ({ graphql, actions }) => { const { createPage } = actions; return new Promise((resolve, reject) => { const blogPostTemplate = path.resolve("src/templates/blogPost.js"); resolve( graphql( ` query { allMarkdownRemark { edges { node { frontmatter { path title tags } } } } } ` ).then(result => { const posts = result.data.allMarkdownRemark.edges; posts.forEach(({ node, index }) => { const path = node.frontmatter.path; createPage({ path, component: blogPostTemplate, context: { pathSlug: path } }); resolve(); }); }) ); });};This is a lot of code, but let's go through this and let me try to explain
The exports.createPages will take 2 variables, "graphQL" to enable a query that is now possible because of what we did beforehand and the "actions" that will be deconstructed so that we use createPage.
After, I return a new Promise that will get a "resolve" and "reject". "resolve" will store the data from your (1) graphQL query and (2) you will let it know where the data should be rendered to.
Here it is interesting to test the output of your query using your local graphQL compiler http://localhost:8000/___graphql, assuming that you are running
gatsby develop
After getting the data that I want, I will loop through the posts and createPage for the path that I have got in my frontmatter and will push all that using the blogPostTemplate component that I will be creating after.
To go through this in more detail gatsby provides a great documentation that could help you.
A blog post template
This will be crucial for you to render your post in the way that you want it. Now that you have all the information that you need, you just need to create the template so that all the post would render in the same way in a programmatic way. The first thing to do here is to create a folder src/templates/blogPost.js. Actually in the step before, I was already considering that you will be doing this.
Here, and similar to what I did on the previous section, I will drop you the code and try to explain after. Here it goes:
import React, { Fragment } from "react";import Header from "../components/Header";import { graphql } from "gatsby";const Template = props => { const title = props.data.markdownRemark.frontmatter.title; const html = props.data.markdownRemark.html; return ( <Fragment> <Header /> <div style={{ fontFamily: "Verdana", margin: "auto", width: "80%" }} > <h2 style={{ textAlign: "center", marginBottom: "30px" }}>{title}</h2> <div dangerouslySetInnerHTML={{ __html: html }} /> </div> </Fragment> );};export default Template;// I will need the pathSlug so that I can query for the correct post// This will query will inject data into propsexport const query = graphql` query($pathSlug: String!) { markdownRemark(frontmatter: { path: { eq: $pathSlug } }) { html frontmatter { title } } }`;The blogPost.js will take the pathSlug in its props so that you can use graphQL to get the data that belongs in that particular post. And that is exactly what I am doing on the export const query. After having the information that I need and in context to that blog post, gatsby makes sure that data is injected in the props of this component so that we can render the blog in the DOM.
After getting the data passed into my component is just a matter of designing the component in the form that I want to. Here, I simply applied same CSS to render with a similar style when compared to the index.js.
Building the tag's pages automatically
Now starts the interesting thing, building the tag's pages considering the inputs in the markdown files in a programmatic way. First of all you will need take into account that in your markdown files you will need to have those tags in your frontmatter.
---path: "/first-post"date: "2019-09-01"title: "My First post"tags: ["this" , "whatsup" ]excerpt: "This is a preview"categories: "HOME"---In a similar way to the creation of the pages and pathSlug for the blog posts, here you will need to work on the gatsby-node.js files as well as to create a two new template component. For all the tags you will have allTagIndex.js and for the individual tags you can create singleTagIndex.js. Please bear in mind that the name really don't matter.
Let's start with the work done in gatsby-node.js, we will touch on the template pages on the next section.
//This will create the pages that are required for the all tog and tagsconst createTagPages = (createPage, posts) => { const allTagsIndexTemplate = path.resolve("src/templates/allTagIndex.js"); const singleTagsIndexTemplate = path.resolve( "src/templates/singleTagIndex.js" ); const postsByTag = {}; //creating the list of tags so that we have 1 place for them all posts.forEach(({ node }) => { if (node.frontmatter.tags) { node.frontmatter.tags.forEach(tag => { if (!postsByTag[tag]) { postsByTag[tag] = []; } postsByTag[tag].push(node); }); } }); const tags = Object.keys(postsByTag); //creating the page with "all tag" posts createPage({ path: `/tags`, component: allTagsIndexTemplate, context: { tags: tags.sort(), posts } }); // creating the individual "tag" page with the correspondent posts tags.forEach(tagName => { const posts = postsByTag[tagName]; createPage({ path: `/tags/${tagName}`, component: singleTagsIndexTemplate, context: { posts, tagName } }); });};All of this piece of code will go on top of the previous snipped of code from the previous section.
In the first part of my code, I am making sure that I get and object considering the tags that I receive from all the posts variable, and I do this because I don't want to have duplicated tags. Given that my end result is a to have an array so that I can (1) sort them and (2) create individual pages (slugs) for all of the tags, I will need to convert that object into an array. I am doing that using Object.keys.
Similarly to what happen with the createPage for the blog post template, I will be doing the same but now for a page that will contain all the tags and for individual pages that will accommodate individual tags.
For all tags I created /tags as the slug and will render that in allTagsIndexTemplate. On the other hand, for individual tags I am using /tags/${tagName} as the slug, where tagName will be any individual tag, and will render those in singleTagsIndxTemplate.
The one thing that is missing here is that you will need to call the function that we just created createTagPages into the exports.createPages after the .then so the we can receive the posts as one of the arguments.
Rendering the post in the proper pages
Finally, the only thing that we are missing out are the template pages that we need to create. The templates will receive receive information via pageContext and render that information to the DOM accordingly. Bear in mind that gatsby-node.js will be injecting tags and posts arrays into the templates.
Here I will only demonstrate the allTagIndex.js component as the singleTagIndex.js will be very similar but instead of getting and array of tags will be only getting a single tag.
import React from "react";import { graphql, Link } from "gatsby";import Header from "../components/Header";import TagsMenu from "../components/TagsMenu";const AllTagsTemplate = ({ data, pageContext }) => { const { posts, tags } = pageContext; console.log(posts); console.log(tags); return ( <div> <Header /> <div style={{ fontFamily: "Verdana", textAlign: "center", margin: "auto", marginBottom: "40px", width: "80%" }} > <h2>Posts about all tags </h2> <TagsMenu tagName={tags} /> {posts && posts.map(post => { const { title, path } = post.node.frontmatter; return ( <Link to={path} key={title}> <h4>{title}</h4> </Link> ); })} </div> </div> );};export default AllTagsTemplate;As you can see, this component will receive pageContext and we will deconstruct posts and tags so that we can render them in our jsx.
Bonus: creating a tag menu
For me is was also interesting to test the concept of creating a menu for our tags, so that the user could click and could see the posts that had those tags. Here I managed to implement that with TagsMenu.js and Tag.js components. I am sure that this is not the best implementation, but it was a quick way for me to test this out and learn.
Bellow you can see the TagsMenu.js component implementation:
import React, { Fragment } from "react";import { Link } from "gatsby";const TagsMenu = props => { const { tagName } = props; let tagOptions = tagName && tagName.map((tagName, index) => { return ( <Link style={{ textDecoration: "none" }} to={`/tags/${tagName}`}> <span style={{ marginLeft: "10px", border: "solid 1px #eee", padding: "5px", backgroundColor: "pink", borderRadius: "5px", textDecoration: "none" }} key={index} > {tagName} </span> </Link> ); }); return ( <Fragment> <div style={{ width: "80%", margin: "auto", marginBottom: "50px", textAlign: "center", dispplay: "flex" }} > {tagOptions} </div> </Fragment> );};export default TagsMenu;Going through this was very useful to me and I hope I can implement this in my blog. The only question that I have now is: will the implementation be similar given that I am using gatsby-theme-blog?
See you around!
More posts about Code

Deploying Keystone-6 with Render
1 minutes read

Paginating through cards in NextJS not changing the url
1 minutes read

Thinking how to fetch data in nextjs
3 minutes read

Learning Advanced React with Wesbos
4 minutes read
Designing and implementing a megamenu in my digital garden
3 minutes read

All you need to know about CSS transitions
2 minutes read
Subscribe
No spam! Only good stuff!