
React Animations
September 06, 2019 . 5 min read
react
animations
As I go through my React complete guide from Udemy I stumble across this 1hr video from that teaches you about how to do React animations 💨! This is great and could be very important to get any project that you are working on more lively and sexy.
I will try to explain my key learnings from going through it! But first here are the resources that you can check out
Resources:
- My Git repo for this
- React Transition Group
Alternatives:
Animation is not only CSS
Animation is all about CSS and styling your components in a certain way. The big difference here is that in React we are used to only render components whenever they are needed and depending on user's input in the UI. That means, and here referring to our Modal.js, that if you would like to change inject animation into the component you would need to (1) have a state prop that will be triggering that, (2) Modal.js would need to use that prop to change the CSS. However, if you only considering doing this, the Modal.js would always be rendered on your DOM. Let's have a look:
//on your App.jsclass App extends Component { state = { modalIsOpen: false }; showModal = () => { this.setState({ modalIsOpen: true }); }; closeModal = () => { this.setState({ modalIsOpen: false }); }; render() { return ( <div className="App"> <h1>React Animations</h1> <Modal show={this.state.modalIsOpen} closed={this.closeModal} /> <button className="Button" onClick={this.showModal}> Open Modal </button> </div> ); }}//on our Modal.jsconst modal = props => { const { show, closed } = props; const cssClasses = ["Modal", show ? "ModalOpen" : "ModalClosed"]; return ( <div className={cssClasses.join(" ")}> <h1>A Modal</h1> <button className="Button" onClick={closed}> Dismiss </button> </div> );};This will change the CSS and you can inject the style that you would like to. You can check my git repo and dig into the CSS files.
Enter React Transition Group
Yes, another library! For me, as given that I super new to coding, this is very interesting. On one hand I am blown away with the fact that there are so many open sourced resources that one can use for their projects🙏! On the other hand, part of me feels that this can be overwhelming to a newbie.
Anyway, this is not the place for that discussion so let's move on. You can check all documentation for React Transition Group here! Give yourself a little bit of time to go through it. I will not elaborate on the different types of components that this library has, neither their properties, instead I will show how would a implementation of this library would look like in our Modal.js component.
import React from "react";import CSSTransition from "react-transition-group/CSSTransition";import "./Modal.css";const modal = props => { const { show, closed } = props; const animationTiming = { enter: 400, exit: 1000 }; return ( <CSSTransition in={show} timeout={animationTiming} mountOnEnter unmountOnExit classNames={{ enter: "", enterActive: "ModalOpen", exit: "", exitActive: "ModalClose" }} > <div className="Modal"> <h1>A Modal</h1> <button className="Button" onClick={closed}> Dismiss </button> </div> </CSSTransition> );};export default modal;Now you, our Modal.js component will render when it needs to, with the proper animation, and will unmountOnExit, meaning that will not be rendered in your DOM when the user closes the Modal.
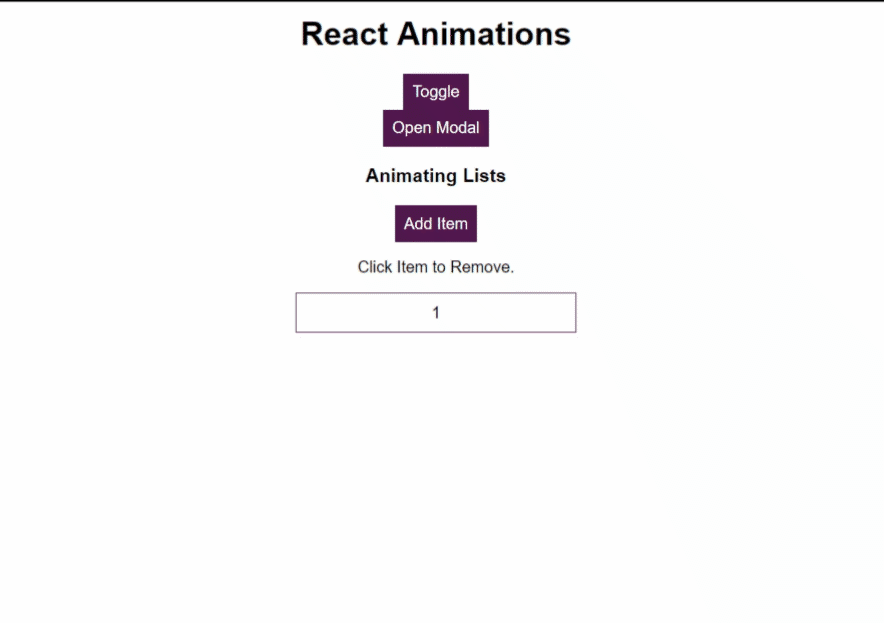
Group animation
Things get a little bit different when you are trying to animate a list in your DOM as that element will normally be used within a map() method. If we implement the <CSSTransition> this will impact the overall list and not consider the different sub-elements of that list. The implementation will be a little bit different and we will be using a different component:
//In the render() of the list.jsrender() { const listItems = this.state.items.map((item, index) => ( <CSSTransition key={index} classNames="fade" timeout={3000}> <li className="ListItem" onClick={() => this.removeItemHandler(item)}> {item} </li> </CSSTransition> )); return ( <div> <button className="Button" onClick={this.addItemHandler}> Add Item </button> <p>Click Item to Remove.</p> <TransitionGroup component="ul" className="List"> {listItems} </TransitionGroup> </div> ); }As you can see here you have our CSSTransition that will inject the .fade CSS class into the <li /> element and you will have a <TransitionGroup /> component that will "listen" to changes on the list to make sure that only the sub-element that is entering or exiting the list will have that CSS. The CSS file will be as follows:
.List { list-style: none; margin: 0 auto; padding: 0; width: 280px;}.ListItem { margin: 0; padding: 10px; box-sizing: border-box; width: 100%; border: 1px solid #521751; background-color: white; text-align: center; cursor: pointer;}.ListItem:hover,.ListItem:active { background-color: #ccc;}.fade-enter { opacity: 0;}.fade-enter-active { opacity: 1; transition: opacity 0.5s ease-out;}.fade-exit { opacity: 1;}.fade-exit-active { opacity: 0; transition: opacity 0.5s ease-out;}Hope you enjoyed and see you around.
More posts about Code

Deploying Keystone-6 with Render
1 minutes read

Paginating through cards in NextJS not changing the url
1 minutes read
Thinking how to fetch data in nextjs
3 minutes read
Learning Advanced React with Wesbos
4 minutes read
Designing and implementing a megamenu in my digital garden
3 minutes read

All you need to know about CSS transitions
2 minutes read
Subscribe
No spam! Only good stuff!